PROLOGUE
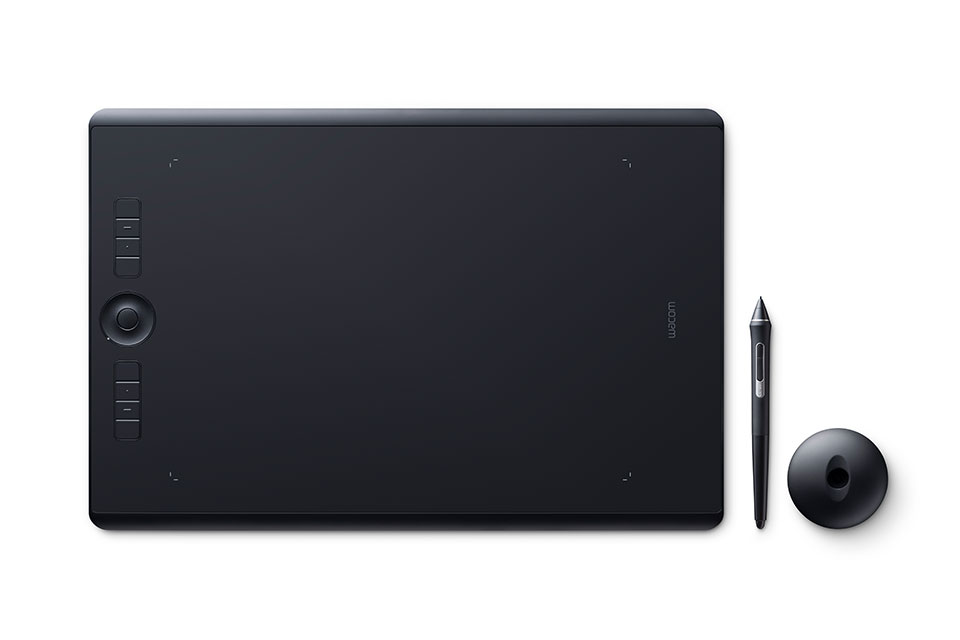
To make digital analog of some natural process you need to keep key points on this process unchanged or as close to reference as possible. Art is a good example of previously totally natural process that took new branch in digital world. I am not an artist but I really obsessed with idea of getting most natural-like digital drawing experience. And as an example I am going to use "Wacom Intuos Pro L". In this topic I want to share with you with my observations, tips, and trick.
EMR TECHNOLOGY
All Wacom devices including "Wacom Intuos Pro L" are using EMR (ElectroMagnetic Resonance). It is one of the oldest and, as for me, it is still the best one. Its perfection in simplicity. let me explain you how it works.
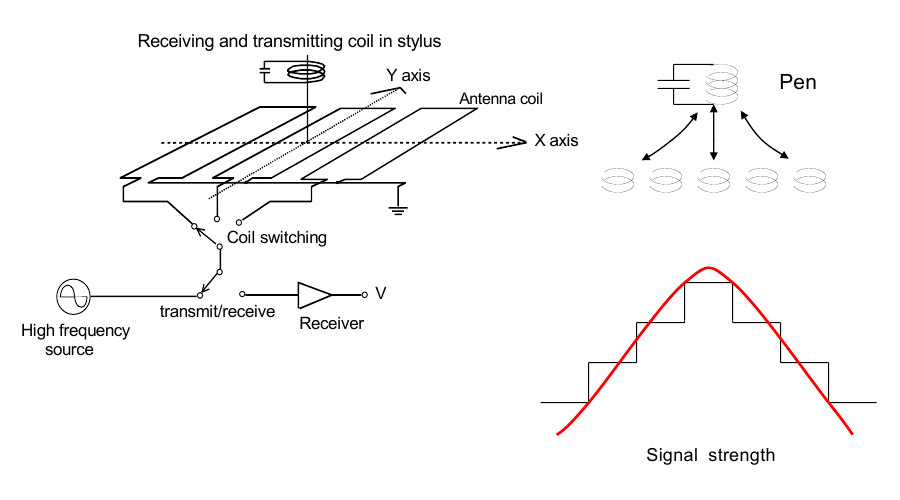
This technology based on electromagnetism. Sensor surface have a lot of small separate transmitters and pen has a coil inside its tip. Transmitters creates electromagnetic field over drawing surface. When pen tip is close to this field if becomes part of electromagnetic circuit. So by processing of data from the multiple transmitters in drawing surface it is possible to recognize pen position in very accurate and precision way.
Position detection is only half of a deal. Pen nib is a small plastic rod inside pen tip that adjoins movable anchor inside the coil I talked before. While you are drawing pen nib transferring pressure to the anchor. Position of anchor inside the coil changing its electromagnetic properties. So when transmitters detecting coil to recognize position they are also take readings about amount of pressure.
And who said that we can have only one coil inside pen tip? Position of two coils on the same axis at different distances from the surface can be detected separately and by calculating this data from both of them we can detect amount of pen tilt and pen tip direction. Some pen models even have third coil to transfer axis rotation data.
As you can see all this readings has an analog nature because pen acts like an element in electromagnetic circuit. It makes EMR technology jitter free.
Electromagnetic field over drawing surface is strong enough to communicate with pen at the 15mm distance above drawing surface. In the same time pen plays passive role in this communication. It means that pen works without any additional power source. it helps to keep it lightweight and do not bothering you to charge it.
Drawing surface and pen communicates on particular frequency so it is easy to distinguish pen from anything else including your skin. It means absolute palm rejection so you can freely move your hand over drawing surface without afraid to put some accidental strokes on the drawing.
As you see EMR looks like a great technology where all features plays in harmony with each other. That is why I like it so much.
SCREENLESS CONSTRUCTION
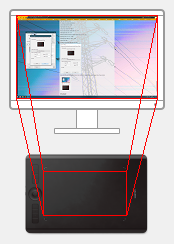
"Wacom Intuos Pro L" is a peripheral screenless device, so while drawing on it, the result can be observed on the screen of the host device, to which it is connected but not on the drawing tablet itself. I think that for desktop usage screenless design fit the most and it is not a big problem for natural-like digital drawing experience. Let me explain why.
There is a misconception that if you do not see your physical pen tip during drawing it becomes inconvenient to draw. The truth that cursor that appears on the screen when you hovering with pen over drawing surface of the tablet is fair enough for brain to be deceived and feel process as natural as you are drawing directly on the screen.
The most important requirement here is to keep drawing surface parallel aligned to the screen of the host device. It helps your brain to do the trick.
Actual size of the active drawing area also matters. For sure it is not suppose to be as big as your actual screen, but still big enough to have control to draw with whole hand starting from shoulder instead of making small and fuzzy movement with you wrist.
And the size of the screen of the host device is not matter at all. With screenless construction you are not tied to the choice made for you. So you can use your lovely 27 inch monitor with perfect color reproduction and hight refresh rate. It is better than staring in 15 inch or pay hell lot of a money for something bigger.
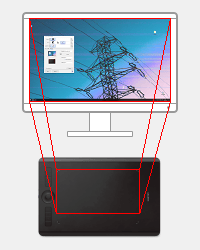
Parallax effect and edge shifting are the main problems of EMR technology. The drawing surface is not a transparent layer - it's a separate plate with lots of electronics on it and it can not be placed over the screen. So in drawing monitors drawing surface placed under screen and that is where the problems begin. Thickness of the screen itself and air gap between glass and matrix of the screen cause parallax effect end edge shifting near the edges of the screen and as the result loss of accuracy and precision. And on screenless devices, you are drawing directly on the drawing surface which makes the problems described above irrelevant. Yes, now laminated screens without air gap are more and more in use in the drawing monitors, but again... in this case, we tied to a particular screen model which usually not the best quality.
Also on literally all drawing monitors I had tilt support was far from perfection. On some of them it stops working near the edges. Sometimes algorithms calculations are buggy and handles 90° angle by jittery jumps in the random way. And sometimes quality of the tilt sensitivity is just poor and during fast or slow movements it is drifting like a drunk. And so on... And "Wacom Intuos Pro L" is devoid of all these flaws: tilt there is precise, handling all angles without random lags or jumps and works across whole drawing surface.
SOFTWARE TWEAKS
To get most smooth natural-like digital drawing experience we need to get rid of all side effects of the system on input and overall workflow. Here is the list of most common tweaks.
Ah, yeah - one more thing... please keep you tablet connected during this changes, because some of this options and sections appears only when you have device connected to your PC.
1. Disabling default Windows touch and drawing features.
Windows itself is a cross-platform OS so it has a lot of tablets features. But we simply do not need them. Most of the time they are ruining everything and interfere with work of "Wacom" drivers. So let's get rid from them.
First at all let's disable strange default Windows visualizations, like annoying cursor rings.
[WIN + X] > Windows Terminal (Admin) > *type "control panel"* > [Enter] > Hardware and Sound > Pen and Touch
Untick "Use the pen button as a right-click equivalent" and "Use the top of the pen to erase ink" check-boxes under "Pen buttons" section.
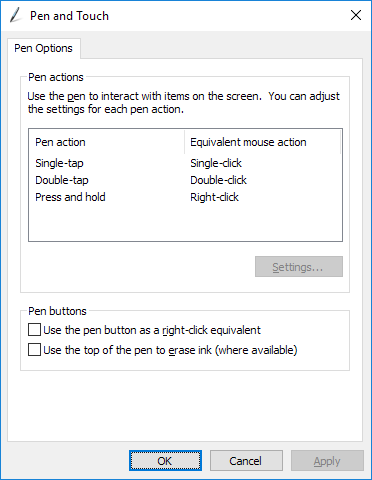
Select "Press and hold" from the list of "Pen actions" and press "Settings...".
Untick "Enable press and hold for right-clicking" check-box.
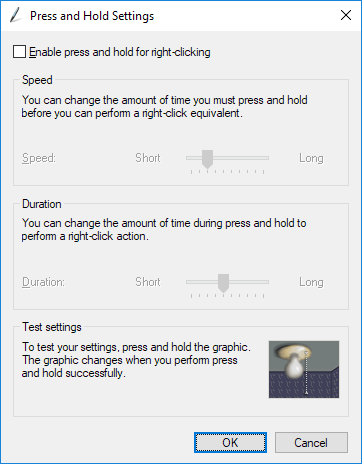
Press "OK".
Apply > OK
Bye-bye annoying circles under cursor!
Now let's suppress "Windows Ink" features in as much as possible. I know it is not actual anymore, but just in case.
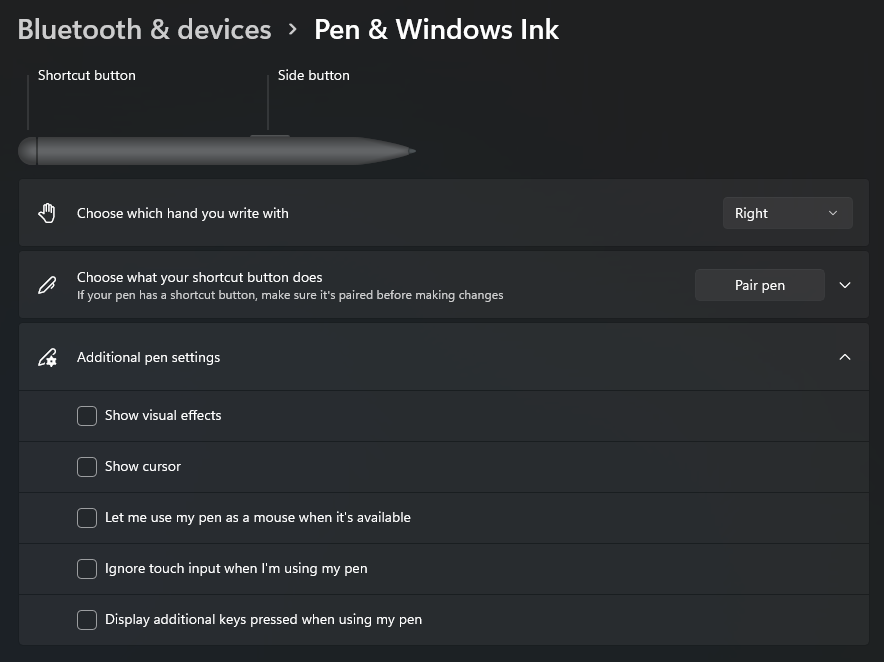
Windows > Settings > Bluetooth & devices > Pen & Windows Ink
In "Additional pen setting" untick all this "helpfull" features.
Finally let's disable "Windows Ink" completely.
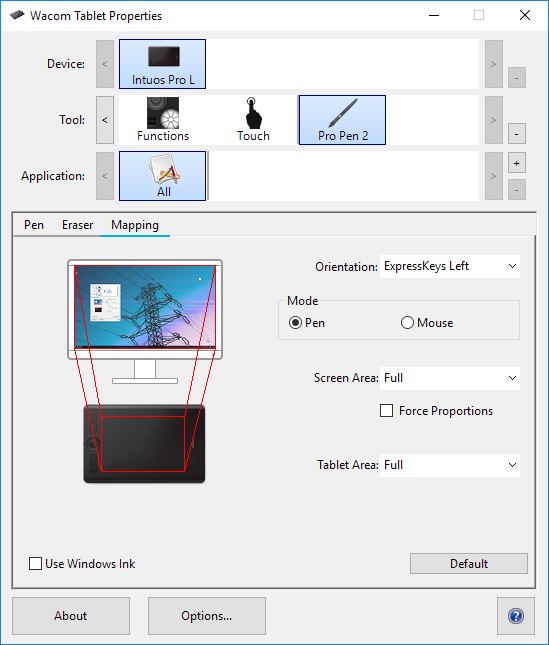
Wacom Tablet Properties > *select your pen* > Mapping
Untick "Use Windows Ink" check-box.
And that's all - no more weird behaving of "Windows Ink" middleware.
2. Advanced lag reduction.
There is one interesting trick to reduce lag during drawing even more. But it's required changing of register so you are doing this at your risk.
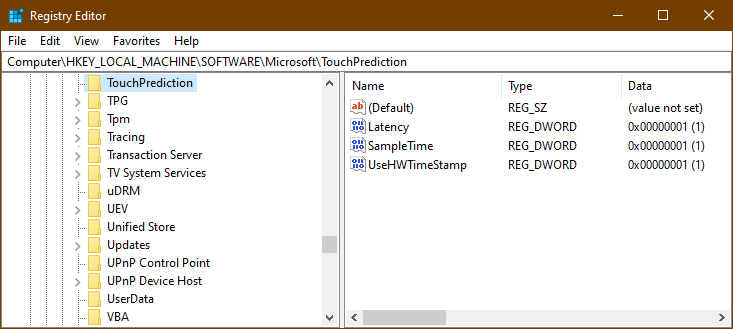
[WIN + X] > Windows Terminal (Admin) > *type "regedit"* > [Enter]
Proceed to: Computer\HKEY_LOCAL_MACHINE\SOFTWARE\Microsoft\TouchPrediction
[Right Mouse Button] on the "Latency" key, click on "Modify...", change "Value data" to "1" and hit "OK".
[Right Mouse Button] on the "SampleTime" key, click on "Modify...", change "Value data" to "1" and hit "OK".
*reboot your PC*
And I can confirm that it's really works for me and especially noticeable on monitors with high refresh rate.
3. Drawing area aspect ratio and alignment.
If you are using FullHD monitor it means that it's aspect ratio is equal to 16:9. And drawing tablets usually are bigger in vertical. By default Wacom driver fitting this two areas to cover both completely. And it means that in this case we have distortion in drawing lines... for example if you are drawing perfect circle on the tablet actually you are getting ellipse on your canvas. To reproduce your drawing gestures as accurately as possible we need to keep aspect ratio of both areas at the same value equal to your screen.
By default Wacom driver has this possibility.
Wacom Tablet Properties > *select your pen* > Mapping
Tic "Force proportion" check-box.
Now drawing area aspect ratio on the tablet is equal to aspect ratio of your monitor and we have big inactive area in the bottom.
I think that better to spread this inactive area equally between top and bottom of the tablet.
Wacom Tablet Properties > *select your pen* > Mapping
In "Tablet Area" drop-down select "Portion".
In "Portion of Tablet" window we can determine actual size of the active tablet area in lines by looking at the maximum values of the "Right" and "Bottom" points.
So I made some simple calculations.
Lines in tablet: 62200 x 43200
Target resolution: 1920 x 1080
(43200-(62200/1920*1080))/2=4106.25
Value to set in to "Top" field: 4106

Press "OK"
Now active drawing area aligned vertically in the middle and its aspect ratio is equal to aspect ratio of your monitor.
4. Adobe Photoshop fix
Because now Windows Ink is disabled you may loose pressure sensitivity in the Photoshop. It can be fixed pretty easily.
Create a .txt file called "PSUserConfig" with text inside:
# Use WinTab
UseSystemStylus 0
Put this file in folder:
C:\Users\*username*\AppData\Roaming\Adobe\*actual photoshop version*\*actual photoshop version* Settings
Example:
C:\Users\TennojiM\AppData\Roaming\Adobe\Adobe Photoshop 2021\Adobe Photoshop 2021 Settings
Restart Photoshop
It suppose to fix all the problems so now you can use Photoshop directly with Wacom drivers and without annoying Windows Ink.
5. Pressure curve calibration
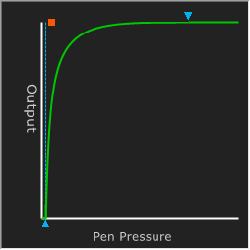
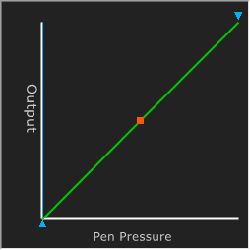
From iteration to iteration EMR pens get more and more so called pressure levels. However if you are using default driver pressure curves I can say for sure that you are not using whole output values range. Pen tip contains spring loaded mechanism. The more you squeeze the spring, the more it resists. It means that pen pressure mechanism has an uneven pressure dependency. Pressure mechanism is pretty loose at the beginning so even when you apply light pressure there is a hight chance to jump over amount of output values and get choppy result. And in the end pressure mechanism became stiff and you need to press harder to reach maximum output value.
Usually users solving this problem by changing pressure curve setting to "soft". But this method only makes things worse. Look at the dependency curve and analyze it.
At the beginning, when you do not even need to put any pressure, dependency curve is steep so you are missing even bigger amount of output values. But later, when you need to put much bigger pressure the dependency curve becomes almost flat and you need to press much harder to reach the maximum output value.
Most of the drawing apps have internal dependency curves. And they are not replacing driver dependency curves but stacking over it and literally inherits all flaws from them. So to have most predictable behavior for the internal app dependency curves you need to keep external driver dependency curves properly calibrated. Let me show how to do it.
Standard default preset will be a starting point.
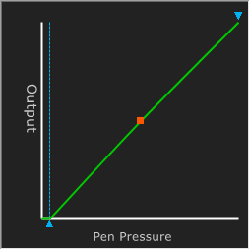
First at all you need to calibrate init pressure force. This is how much pressure need to be applied to init stroke with lowest output value. EMR technology is very sensitive and can recognize even very light pressure.
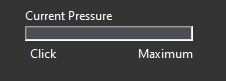
Move bottom flag to the left end point. Tap on the test field. Most probably after first tap pen will get jammed in the pressed state.
Move bottom flag it to the right pixel by pixel and after each movement repeat jam test until you find flag position in which pen will stop getting jammed in the pressed state. For me it is about 1 pixel.
Now you need to calibrate maximum pressure force. This is how much pressure would be enough to reach maximum possible output value. With this setting you are cutting off the pressure range that is physically unreachable in regular drawing process. Exactly this setting is responsible for the pen softness and no other.
Starting from the right end point move top flag to the left. Time to time apply changes and check on the gauge if you can reach maximum output value without applying unnatural for the regular drawing amount of pressure.

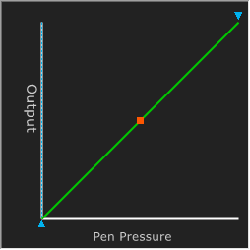
And in the end you need to compensate uneven resistance of the spring loaded mechanism by reducing sensitivity at the beginning when mechanism is loose and by increasing sensitivity at the end when mechanism is stiff.
Move middle flag like on the screen. Dependency curve should be flat for the pressure range where sensitiveness of the mechanism is higher and steep for the pressure range where sensitiveness of the mechanism is lower.
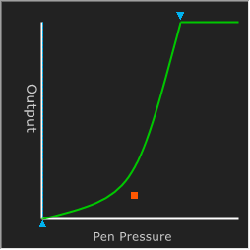
Your preference may be different. But look, how uniform output value transition right now.
HARDWARE TWEAKS
Phisical aspects in using such kind of devices directly affects your experience. In this chapter I will tell you about few hardware tricks to dramatically increase physical convenience in using drawing tablets.
1. Paper-like drawing surface.
Yes, Wacom Intuos Pro L already has some kind of paper-like surface, but to be honest it feels more like a sandpaper that... well... paper. Even "smooth" version of the surface. And what is worse that it is not only feels like a sandpaper, it is also works like a sandpaper and wearing out pen nibs rapidly. And in the same time covering with scratch marks pretty easily.
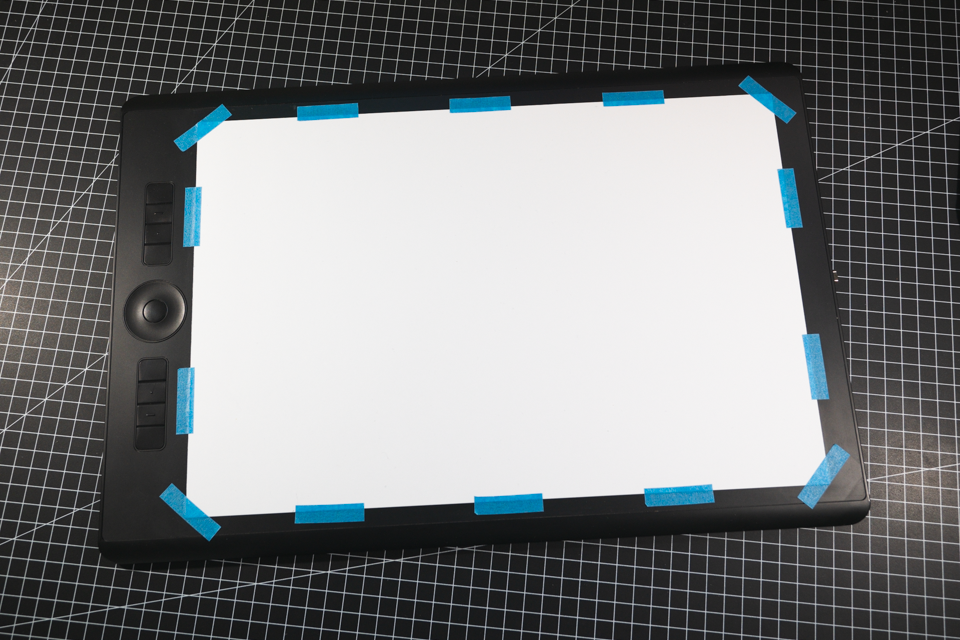
If you want to have real paper-like feel during drawing, just cover drawing surface of the tablet with peace of paper for pencil drawing. Fix it with soft masking tape in certain points. Sheet of paper is not affecting signal at all. Only thing to to be aware is to avoid air gap between paper and drawing surface.
Now you are literally drawing over paper-like surface and it works like a charm.
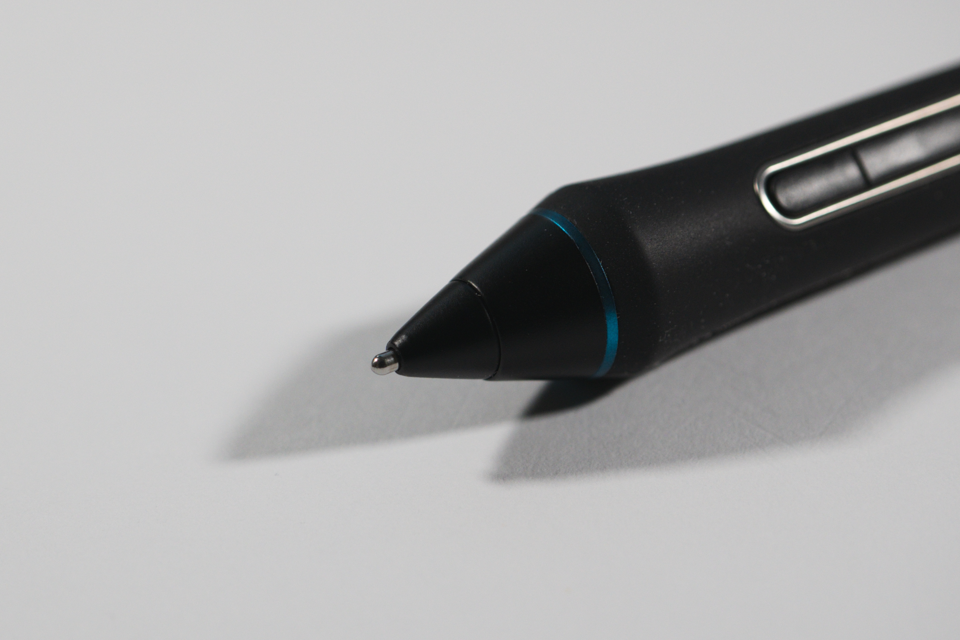
2. Durable pen nibs.
For some reasons in the latest generation of pens Wacom decide to change form-factor of the pen nibs. Drawing part of this nibs stays exactly the same in size like for predecessor but body of this nib is twice thinner. Also this nibs are made from some really soft plastic and in combination with sandpaper surface they are wearing off in 1-2 hours of active usage. Because for all this years Wacom did not solve the problem of nib backlash and rotation inside the nib socket, right from the moment when one of the sides of the nib loosing its round shape it starts to rotating and skipping on the surface and it makes drawing process pretty uncomfortable.
And here is the most crazy solution in this guide. Titanium nibs. I think most of you could not even imagine something like this exists, just as I. But it exists, cost damn cheap and extremely durable.
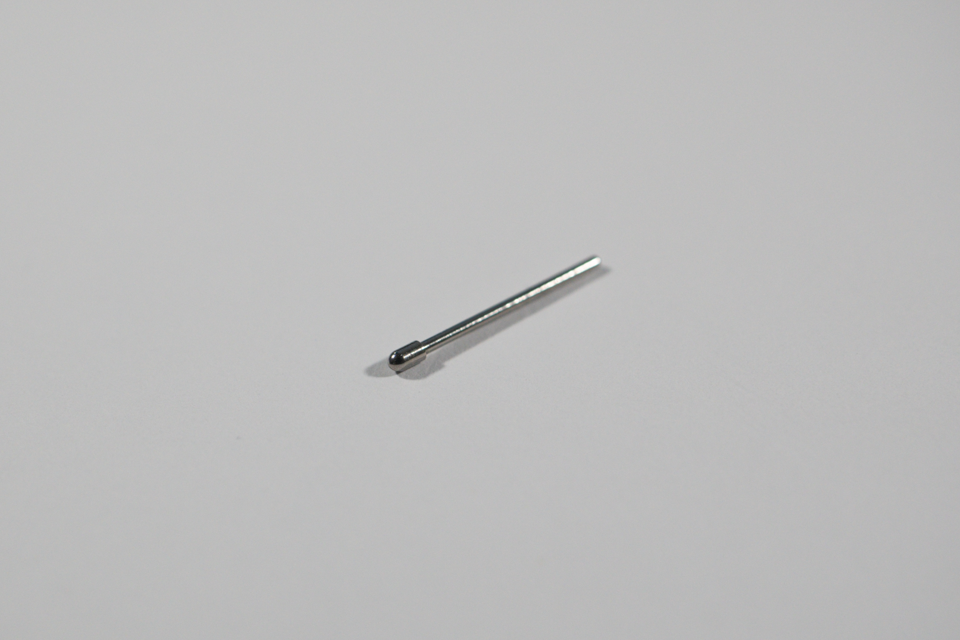
Over original surface it feels much more smoother... more like an old versions of Intuos tablet. And over the paper cover it feels like a soft ballpoint pen. So give it a try.
3. Durability of the connection socket.
Nowadays simple USB Type-C connection is enough to transfer data, video (for screen devices) and power to your drawing tablet via one single cable. And "Wacom Intuos Pro L" is not an exclusion. Actually it is even has wireless Bluetooth connection possibility, but meh... it's laggy and here we are fighting for every millisecond so forget about it and let's stick to physical connection. The biggest practical problem of the physical connection that like any other mechanical part it has durability limit. And once this limit is reached device can become totally unusable despite that everything else works fine.
To reduce wearing of the connector socket on your drawing tablet I recommend you to have a look at the the magnetic conversion solutions.
More cheap solutions comes as a cable with integrated magnetic connector on one of the sides. Try to avoid them because in most cases it is a low quality junk. Also pay attention that some of the solutions on the market only for charging and can not transfer data.
I am using more universal combination of cable converter that allows me to use any USB Type-C cable and socket pin that fits for this connector. Here is how it looks like.
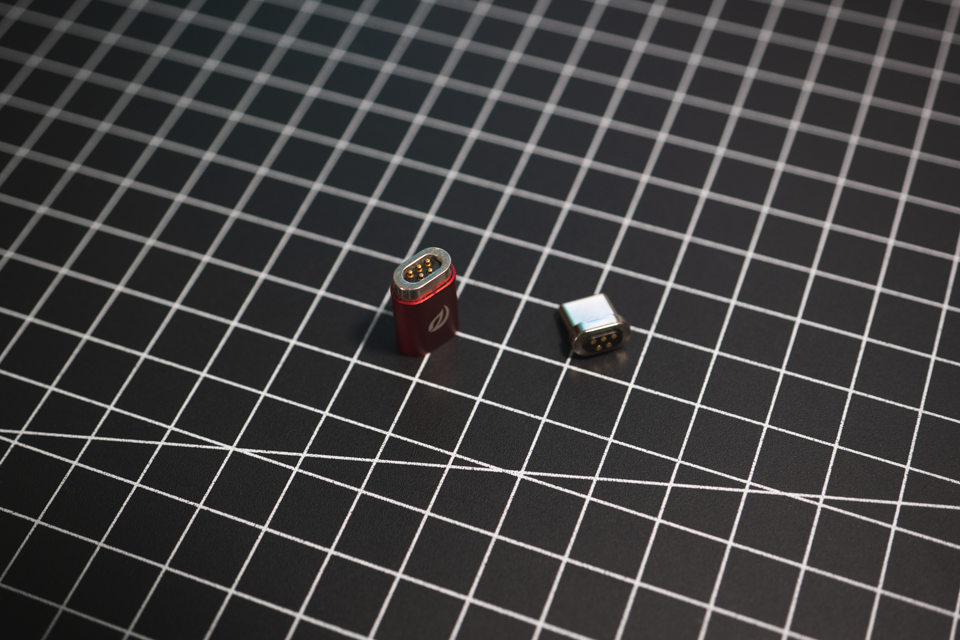
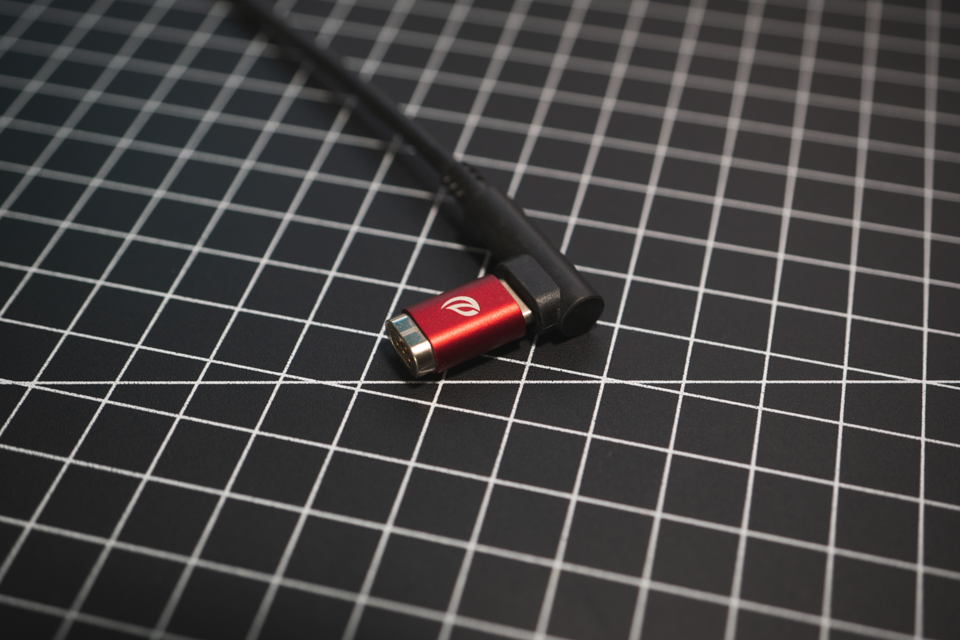

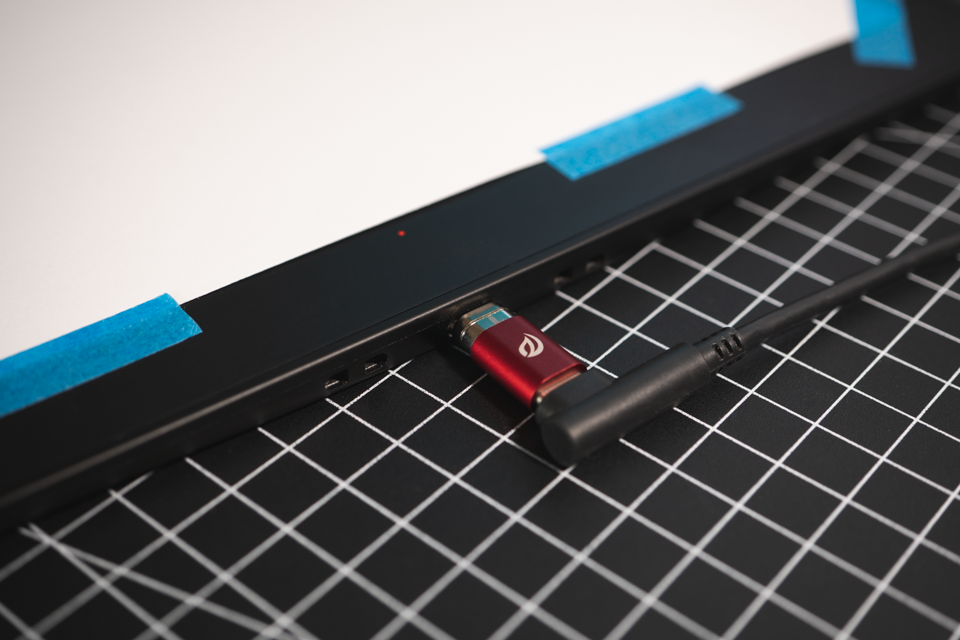
With this solution you are minimizing wearing of your drawing tablet connection socket and also preventing some incidents with cable pulling.
EPILOGUE
In the latest update of this article I refined information about device in more short way and also add some hardware tricks. I hope you like it.
Created by TennojiM
All rights reserved
© 2025
All rights reserved
© 2025